This is default featured slide 1 title

Go to Blogger edit html and find these sentences.Now replace these sentences with your own descriptions.

This is default featured slide 2 title

Go to Blogger edit html and find these sentences.Now replace these sentences with your own descriptions.

This is default featured slide 3 title

Go to Blogger edit html and find these sentences.Now replace these sentences with your own descriptions.

This is default featured slide 4 title

Go to Blogger edit html and find these sentences.Now replace these sentences with your own descriptions.

This is default featured slide 5 title

Go to Blogger edit html and find these sentences.Now replace these sentences with your own descriptions.

Tuesday, December 2, 2008

Secure Your Laptop With Laptop Alarm

Did you ever hesitate to leave your laptop for a few minutes in a public space like a library? No need for that with Laptop Alarm. Laptop Alarm will emit a loud alarm whenever someone tries to steal your laptop.

  • Protects using proven technologies when your power cable or external peripherals are disconnected or when the mouse is moved
  • Compatible with all Windows  versions
  • It's just 200 kb!

Laptop Alarm is the recommended solution for anyone with a laptop on the road or in public places.


OS: Windows 98/Me/NT/2000/XP |Freeware

Tweak Vista Settings with Ultimate Windows Tweaker

Ultimate Windows Tweaker is a Tweak UI Utility for tweaking and optimizing Windows Vista, 32-bit & 64-bit.The utility has a simple easy-to-use user interface, with the tweaks being classified in separate heads based of their functionality. Most tweaks are hidden inside Vista, and what this tweaker does is to try and put the useful one's in one place.

Its only 368 KB EXE file which even doesn’t need any installation. You can directly run it after downloading so you can also carry it on your USB drive.You can also create a system-restore point just by clicking a button in the Ultimate Windows Tweaker window--handy just in case a tweak goes awry. Or click Restore Defaults to set everything back the way it was.

The tweaks are classified under seven categories and can be accessed through a common interface, just like your Windows Vista Control Panel.
1) Personalization,
2) User Accounts & UAC,
3) System & Performance,
4) Security,
5) Internet Explorer (IE7 / IE8)
6) Network Optimization
7) Additional Options

Ultimate Windows Tweaker

SysReq:Vista32/64 bit|I E 7 or higher|Freeware|368KB

Thursday, November 13, 2008

How to Disable Use of USB Storage Devices in Windows?

image

What happens if the users bring their own USB memory sticks and connect them to the computers at their office?With the size of USB storage devices increasing so much in recent years, the risk is increasing as more and more data could possibly be stolen or lost accidentally.

You can restrict access for installing new USB storage devices by changing the permissions of these files:

Type %windir%\inf in Explorer address bar or RUN dialog box and press Enter. It’ll open “inf” folder.

  • %SystemRoot%\Inf\Usbstor.pnf
  • %SystemRoot%\Inf\Usbstor.inf

To assign a user or group Deny permissions to the Usbstor.pnf and Usbstor.inf files, follow these steps:

  • Start Windows Explorer, and then locate the %SystemRoot%\Inf folder.
  • Right-click the Usbstor.pnf file, and then click Properties.
  • Click the Security tab.
  • In the Group or user names list, click the user or group that you want to set Deny permissions for.
  • In the Permissions for UserName or GroupName list, click to select the Deny check box next to Full Control, and then click OK.
    Note In addition, add the System account to the Deny list.
  • Right-click the Usbstor.inf file, and then click Properties.
  • Click the Security tab.
  • In the Group or user names list, click the user or group that you want to set Deny permissions for.
  • In the Permissions for UserName or GroupName list, click to select the Deny check box next to Full Control, and then click OK.

image

You can disable USB storage access for a certain group of users this disabling and re-enablement of USB ports is based on a simple registry entry

If a USB storage device is already installed on the computer, set the Start value in the following registry key to 4:

HKEY_LOCAL_MACHINE\SYSTEM\CurrentControlSet\Services\UsbStor

When you do so, the USB storage device does not work when the user connects the device to the computer. To set the Start value, follow these steps:

  • Click Start, and then click Run.
  • In the Open box, type regedit, and then click OK.
  • Locate, and then click the following registry key: HKEY_LOCAL_MACHINE\SYSTEM\CurrentControlSet\Services\UsbStor
  • In the right pane, double-click Start.
  • In the Value data box, type 4, click Hexadecimal (if it is not already selected), and then click OK.
  • Quit Registry Editor

image

To setup read only USB storage device operation, follow these steps below:

1. Click on the Start Button and type in Regedit and hit Enter.
2. Navigate through HKEY_LOCAL_MACHINE\SYSTEM\CurrentControlSet\Control.
3. Right click on Control and select New and then Key. Call the new key StorageDevicePolicies.
4. Right click on StorageDevicePolicies and select New and then Dword. Call the new dword WriteProtect.
5. Right click on WriteProtect and select Properties. Set the value to 1 and hit OK.
The computer is now configured to disable writing to USB storage devices.

Free tool - http://www.intelliadmin.com/blog/2007/01/disable-usb-flash-drives.html (two versions: local and remote)

To re-enable USB storage devices, you will need to restore the original permissions. From Windows 2000, or Windows XP  in Safe Mode:

  1. Click Start and then Run... and type %systemroot%\inf
  2. Look for usbstor.inf, right-click on it and click Properties.
  3. Click the Security tab, remove "SYSTEM" from the list.
  4. Click "Advanced..." and turn on "Allow inheritable permissions..." Click OK to save the change and OK again to close the Properties window.
  5. Repeat for usbstor.pnf.

Software wroth to try : Windows Network USB Drive Blocker 2.0.1.5

Gmail Adds Video and Voice Chat

Google announced that it is integrating a voice and video plug-in for it Gmail Chat offering that lets you see or hear the friend with which you are chatting.

image The feature looks cool, and it’s exceedingly straightforward. When you’re in Gmail, your contact list will show a little green camera icon next to any buddy who has a Webcam, is online, and has installed the Gmail Voice and Video Chat plug-in (which works with IE 7, some versions of IE 6, Firefox, Safari, and, of course, Chrome). Click the icon, and you get a chat window with video in the bottom right-hand corner of the Gmail interface. (You can also blow it up to full-screen mode.)

In order to access Gmail Video and Voice Chat, users have to install the voice and video plug-in.Installation is easy and only takes a few seconds to download the plug-in. Once the browser is restarted, a "Video and more" menu will appear at the bottom of the Gmail page. Go to the menu and select "start video chat." It will take a few moments for the video call to connect with your friend.


vista012

Tuesday, October 28, 2008

Removal of PC Privacy Cleaner

PC Privacy Cleaner is a fake registry cleaner tool, which pretends to be able to clean your registry.PCPrivacyCleaner may spread with trojans, or you can get duped into downloading PCPrivacyCleaner from PCPrivacyCleaner.com. Once you’ve got PCPrivacyCleaner, it pops up annoying messages and runs fake scans.

Symptoms

  • "Critical System Error",
  • "Your computer is infected",
  • Hijacked homepage to obscure webpage.
  • Flashing icons appear on your system tray (Near of your system clock).

    Manual Removal Steps

    1.Press Ctrl+Alt+Del to open Task Manager,check any process like pcpc.exe/PCPC_Setup_Free.exe running,kill that process

    2.Open C:\Program Files (assuming windows installed in C drive) and delete the folder named PCPrivacyCleaner or To find PCPrivacyCleaner directories, go to Start > My Computer > Local Disk (C:) > Program Files > Show the contents of this folder.Search and delete the following PCPrivacyCleaner directories:
    C:\ProgramFiles\pcprivacycleaner
    %common_programs%\pcprivacycleaner
    %program_files%\pcprivacycleaner

    3.Remove  PC Privacy Cleaner  short cuts from desktop, start menu and quick launch.Empty Recycle Bin

    4.If PCPrivacyCleaner changed your homepage?Start menu > Control Panel > Internet Options. Next, under Home Page, select the General > Use Default. Type in the URL you want as your home page (e.g., “http://www.google.com”). Then select Apply > OK. You’ll want to open a fresh web page and make sure that your new default home page pops up.

    5.How to remove PCPrivacyCleaner registry keys?

    Start->Run-> type regedit and press enter.Remove following entries

    HKEY_CURRENT_USER\software\pcprivacycleaner
    HKEY_CURRENT_USER\software\pcprivacycleaner activationcode
    HKEY_CURRENT_USER\software\pcprivacycleaner cookieparams
    HKEY_CURRENT_USER\software\pcprivacycleaner installdate
    HKEY_CURRENT_USER\software\pcprivacycleaner lastscantime
    HKEY_CURRENT_USER\software\pcprivacycleaner totalscancount
    HKEY_CURRENT_USER\software\pcprivacycleaner\schedule
    HKEY_LOCAL_MACHINE\software\microsoft\windows\currentversion\run pcprivacycleaner                                                                                                 HKEY_LOCAL_MACHINE\SOFTWARE\Classes\CLSID\{70d17a5f-ef27-4295-90f5-20ad6f24834f}
    HKEY_LOCAL_MACHINE\SOFTWARE\Classes\CLSID\{80ced3d6-ece9-48ba-8df8-2503d8d87c2b}
    HKEY_LOCAL_MACHINE\SOFTWARE\Classes\CLSID\{aa6d4f53-4c8d-4549-84d2-02d584acc4e9}

    6.How to remove PCPrivacyCleaner DLL files

    To locate the PCPrivacyCleaner DLL path, go to Start > Search > All Files or Folders. Type PCPrivacyCleaner and in the Look in: select either My Computer or Local Hard Drives. Click the Search button.

    Once you have the PCPrivacyCleaner DLL path,Start->Run->type cmd and click “OK.” To change your current directory, type “cd” in the command box, press your “Space” key, and enter the full directory where the PCPrivacyCleaner DLL file is located. (If you’re not sure if the PCPrivacyCleaner DLL file is located in a particular directory, enter “dir” in the command box to display a directory’s contents. To go one directory back, enter “cd ..” in the command box and press “Enter.”)

    Here you type regsvr32 /u [dll_name] and press enter to unregister the DLL.If you accidentally do something wrong, you can register it again by using regsvr32 [dll_name].eg:regsvr32 /u pcpc.dll  .(How to register/unregister a .dll file)

    PCPrivacyCleaner Automatic Removal Instructions

    Print these instructions because you’ll have to reboot into Safe Mode. Also back up your computer in case you make a mistake

    1. Download and save SmitFraudFix to your desktop.

    2. Restart your computer in Safe ModeOnce thedesktop appears, double click on the SmitfraudFix.exe on your desktop.

    3. After the credits screen, you’ll see a menu. Select the option number 2, which is ‘Clean (safe mode recommended)’, and thenpress Enter to delete infect files.

    4. SmitFraudFix will begin cleaning your computer and take a series of cleanup processes. When the process is over, it will automatically begin the Disk Cleanup program.

    5. Once the Disk Cleanup program is complete, you will be prompted with the message ‘Registry cleaning - Do you want to clean the registry’. Answer Y (Yes) and hit Enter. Reboot your computer.

    6. SmitFraudFix will now check if wininet.dll is infected. SmitFraudFix will ask you whether to replace the infected file (if there’s any) ‘Replace infected
      file?’
      Answer by typing Y (Yes) and hit Enter.

    7. Reboot your computer to complete the cleaning process.

    8. After reboot, a Notepad screen may appear containing a log of all the filesremoved from your computer. If it doesn’t appear, a file will be created called rapport.txt in the root of your drive, (Local Disk C:).

    9. Restart your computer in Safe Mode .

    10. Go to C:\Windows\Temp, click Edit, click Select All, press DELETE, and thenclick Yes to confirm that you want all the items to go to the Recycle Bin.

    11. Go to C:\Documents and Settings\[LISTED USER]\Local Settings\Temp, click Edit, click Select All, press DELETE, and then click Yes to confirm that
      you want all the items to go to the Recycle Bin.

    12. Reboot your computer back to normal mode.

    How to use  SmitfraudFix ,detailed instructions here

  • Thursday, October 23, 2008

    How to Shrink Document by One Page in Word 2007

    A document whose last page is mostly blank is a waste of printer paper, especially if you have to make a lot of copies. Your letters and mailings will also look mere professional if they fill the pages nicely. If Print Preview reveals a skimpy last page.  Shrink One Page button in Word will tweak the fonts lathe document to make it a page smaller. Don't like the results? Just press Ctrl-Z to Undo.

  • Display your document in Print Preview (by either clicking on the Print Preview button on the toolbar or choosing the File, Print Preview command)

    image

  • Click on the Shrink to Fit button on the toolbar of the Preview window

    image

  • Click on the Close button to exit preview and return to your previous view

    Word will automatically reduce the font size of the document (maintaining the relative font sizes).

  • How to Use Document Inspector in Word 2007

    The Document Inspector in Microsoft Word 2007  provides a central location for you to examine documents  for personal, hidden, or sensitive information. You can  use built-in Document Inspector modules to remove unwanted information more easily. Utilizing the Inspector tool is one way of safeguarding any information you want to remain private.

    In documents, personal information is any information that identifies or can be used to identify, contact, or locate the person to whom such information pertains.This includes

  • Your name and initials

  • Your company or organization name

  • The name of your computer

  • The name of the network server or hard disk drive where you saved the document

  • Other file properties and summary information

  • Non-visible portions of embedded OLE objects

  • The names of previous document authors

  • Document revisions

  • Document versions

  • Template information

  • Hidden text

  • Tracked changes and comments

    How to use it?

    1.Click the Microsoft Office Button and point to Prepare

    image

    2.Click Inspect Document. The Document Inspector dialog box is displayed.When launching the inspector, if you haven't saved your file before making the most recent changes, you will be prompted to do so. It's not required that you save; however, the reason we provide this dialogue is because once you run the inspector, and choose to remove certain components of a document, they are GONE.

    image

    3.Select the modules corresponding to the types of content you want to search for, and then click Inspect.After the inspection is finished, the Document Inspector dialog box shows which modules found content in the document. It also provides buttons to remove that content.

    image

    The Inspect button also changes to Reinspect. If you click the Reinspect button at this point, the Document Inspector screen is re-displayed, enabling you to choose additional modules for inspection.

    4.To select other modules for inspection, click Reinspect. Otherwise, click Close.

  • Monday, October 20, 2008

    McAfee Site Advisor

    McAfee SiteAdvisor helps protect you from all kinds of Web-based security threats including spyware, adware, spam, viruses, browser exploits, and online scams. Automated testers continually patrol the Web to browse sites, download files, and sign-up for things with e-mail addresses. As you search, browse, download, or register online, SiteAdvisor's safety ratings help you stay safe and in control.

    When you do a google search or a yahoo search, a little symbol will appear next to each entry. A green check means it is a safe site to enter,no viruses or trojans there. A yellow question mark means it has questionable content.You might get something evil there. A red X means it is a site known for trojans and malicious software. Don't enter a site unless it shows a green check.

  • Protects you from adware, spyware, spam, viruses and online scams.

  • Advises you about the safety of sites using a colored button in your browser toolbar.

  • Enhances your online search by placing safety ratings next to search results.

  • Warns you about dangerous sites and search results with clear messages.

  • Provides you with all the details about a site's safety rating on request.

  • Updates automatically to protect against new threats

    McAfee SiteAdvisor (Free Ver)

    McAfeeSiteAdvisor +: McAfee SiteAdvisor Plus | Mcafee Siteadvisor Plus 2.1.2.25.

  • Saturday, October 18, 2008

    Send an Anonymous Email Message With Note2Email

    Note2Email is a simple web service that lets you send email messages anonymously to anyone without signing up with the service.You can optionally enter in a special encryption key such that the recipient will only be able to read the email if they know it.

    When browsing the Internet from an untrusted network or an office computer it can be unsafe to type in the email account password. This tool was designed to help users send themselves email notes without logging in to their email account

    Your IP address is not passed in the message header so your identity remain hidden and the email recipient will never know who exactly sent that message and from where.

    Features

  • Your email will be from "note[at]note2email.com",which enables you to set up a filter in your email service or program and create a repository folder for notes sent to yourself.

  • Note2email relieves you from needing a web-based email if sending email notes from a computer that’s not your own.

  • Note2email relieves you from needing to log into web-based email in order to send email notes from a computer that’s not your own. This is both more secure (alleviates any risk of compromising your account password) and will save you time otherwise spent logging in.

  • You can send email with a special encryption key that you specify. Your recipient will only be able to view the email if they can enter in your key.

  • Spam protection: you will need to identify the note2email logo from other random images to send email with note2email. This protects against random spammers using the service for junk mail.

  • note2email allows you to send email fairly anonymously to any address. (Note: anybody with little technical skills can send an email disguised as being from anyone they choose. At least with note2email the sender is "note2email" and not some fake identity).

  • Bookmarklet for taking quick notes by email is in the works.

    Note2email

  • Google Email Uploader

    The Google Email Uploader is a desktop utility for Microsoft Windows that uploads email and contacts from other desktop email programs (like Microsoft Outlook) into your Google Apps mailbox. The Email Uploader preserves information such as sent dates and sender/recipient data, as well as the folder structure used by the other email program. The Google Email Uploader requires a Google Apps account.
    The Email Uploader is Apache 2.0 licensed open source software, and is governed by the terms of the included license file. This means you may modify the tool to better suit your needs


    Tuesday, October 14, 2008

    Unlocking Administrator Account In Windows Vista

    Deep inside Windows, there’s a secret Administrator account, and it’s different from the normal administrator account you most likely have set up on your PC.On Vista, the difference is more than the name: the Administrator account is not subject to User Account Control. So the Administrator can make any changes to the system and will see no UAC prompts.

    For this reason, you may want to unlock the Administrator account, and use it only for those times when you want to make a series of system changes and don’t want to be bothered by UAC. True, you could instead simply disable UAC on your system, but it’s a pain to do this, and you may forget to turn it back on.

    Turning on the Administrator account is straightforward.

    You can unhide or turn on the Administrator account using the steps below:

    1. Type cmd in the Search field on the Start menu. Right click the command prompt icon at the top of the Start menu and click Run as administrator.
    2. Type ‘Net user administrator /active:yes’.

    pic

    Once you complete these steps, the Administrator account will appear on the Welcome screen. To disable once again hide the account, repeat step 1 described above and type ‘Net user administrator /active:no’.

    Wednesday, September 24, 2008

    Add Yahoo Messenger to Your Website

    Yahoo! introduced  a new service called Pingbox , a live chat box (in the form of a Flash Widget) .You can  embed it  in any website or blog including your MySpace, Friendster, Hi5, Blogger, live space, etc...

    image

    You can customize your Yahoo! Pingbox through the dozen or so themes available in the Pingbox studio. The Pingbox widget  will automatically become unavailable When you go offline or set your status as ‘invisible’

    img_3240_yahoo_messenger Yahoo! Messenger Pingbox™

    Mobile Master

    Mobile Master is a powerful PIM and synchronization tool for mobile phones and iPod. You can synchronize mobile phones (addresses and calendar) with Outlook Outlook Express, Windows address book, Windows contacts, Lotus Notes, Thunderbird/Sunbird, Palm Desktop. You can load, edit and save your phones address book, calendar and notes. Browse through the phones file system and copy files. Synchronize your iTunes playlists and files or copy WinAmp playlists to the phone.

    image

    Use Mobile Master and its practical browser and drag-and-drop functionality to transfer iTunes playlists or individual songs and to synchronize playlists from iTunes with walkman phones: As soon as your phone is connected, the personal music collection on the phone is updated. This also applies for photos: Mobile Master checks whether new photos have been taken and transfer then to your PC every time you synchronize .Full features & Supporting phones list here

     image

    Download icon

    Add The Encrypt/Decrypt Option To The Context Menu


    image 
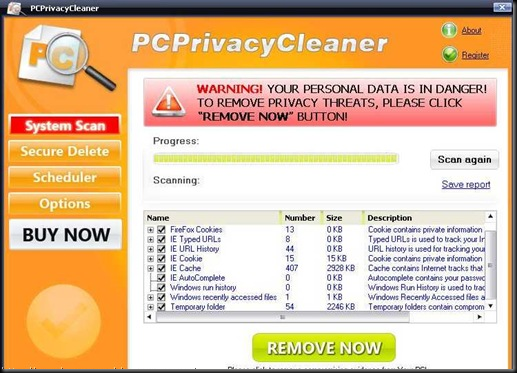
Vista has the option to encrypt and decrypt files by accessing the properties dialog. But there is a better and faster way to do it—just add these options to the context menu. Open the Registry editor and navigate to HKEY_CURRENT_USER\Software\Microsoft\Windows\CurrentVersion\Explorer\Advanced
    image
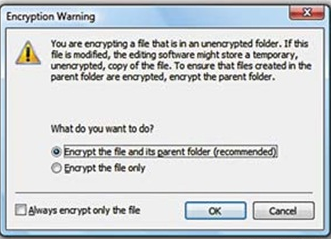
In the right pane, create a new 32-bit DWORD value called Encryption Context Menu and give it a value of 1. Now whenever you rightclick
    a file, you will see a new option,Encrypt, which will let you encrypt it
    (along with the parent folder, if necessary). Once it’s encrypted, when you right-click on it, you will see the Decrypt option. 

    Shrink Or Expand Disks in Vista

    image 
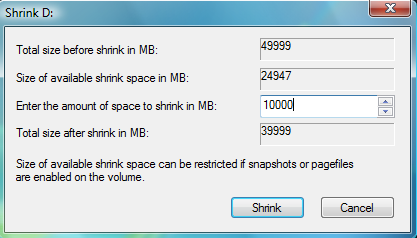
Windows Vista comes with Disk Management, which even lets you shrink or expand volumes without destroying data on them. No need to buy expensive third-party utilities! Open the Control Panel, type in
    partition and press [Enter]. You will  immediately see the link Create and format hard disk partitions under Administrative Tools. Click on it to launch Disk Management. Right-click on a partition and you will see the Shrink as well as Extend options. You should defrag the partition before doing the shrinking or image
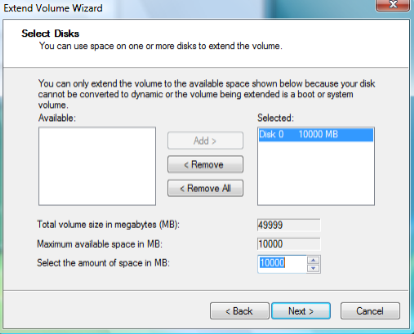
expanding to achieve the best results, since the operation is dependant on the amount of contiguous free space available.